Printing Industry Exchange (printindustry.com) is pleased to have Steven Waxman writing and managing the Printing Industry Blog. As a printing consultant, Steven teaches corporations how to save money buying printing, brokers printing services, and teaches prepress techniques. Steven has been in the printing industry for thirty-three years working as a writer, editor, print buyer, photographer, graphic designer, art director, and production manager.
|
Need a Printing Quote from multiple printers? click here.
Are you a Printing Company interested in joining our service? click here. |
The Printing Industry Exchange (PIE) staff are experienced individuals within the printing industry that are dedicated to helping and maintaining a high standard of ethics in this business. We are a privately owned company with principals in the business having a combined total of 103 years experience in the printing industry.
PIE's staff is here to help the print buyer find competitive pricing and the right printer to do their job, and also to help the printing companies increase their revenues by providing numerous leads they can quote on and potentially get new business.
This is a free service to the print buyer. All you do is find the appropriate bid request form, fill it out, and it is emailed out to the printing companies who do that type of printing work. The printers best qualified to do your job, will email you pricing and if you decide to print your job through one of these print vendors, you contact them directly.
We have kept the PIE system simple -- we get a monthly fee from the commercial printers who belong to our service. Once the bid request is submitted, all interactions are between the print buyers and the printers.
We are here to help, you can contact us by email at info@printindustry.com.
|
|
Archive for October, 2023
Monday, October 30th, 2023

Photo purchased from … www.depositphotos.com
The Printing Industry Exchange Blog is #12 of the best 40 digital printing blogs, as selected by FEEDSPOT.
Every so often I come upon a book that reminds me why book printing has not disappeared, in spite of rumors over the past several years. In fact, based on my recent research, it seems that there has been a resurgence in the printing of physical books. After all, ebooks do not have a tactile component—at all. None. There’s no smell or feel of the paper, and no difference in coating texture between various elements on the cover of an ebook. Don’t get me started.
At the very least I’m pleased that my print brokering clients who produce print books on a regular basis continue to do just that.
In this light I have collected a number of books in the past several weeks and will endeavor to break down for you those elements of cover design that go beyond just the visual enhancements.
Varnish vs. Foil Stamping vs. Embossing
My fiancee has a book about statins (drugs that reduce cholesterol) called A Statin Nation. The background of the front cover (the front of a pill bottle on a light blue screen) as well as the spine and the back cover (exclusive of most of the text) are flood coated with a dull varnish (or a matte film laminate). This absorbs all light rather than reflecting it back to the reader’s eyes.
In contrast, the print book designer has flood gloss coated the title, A Statin Nation, on both the front cover and the spine. Because of this, the title jumps off the page whenever the reader moves the book and these words catch the light.
In short, by accentuating the difference between the matte coating on the overall background of the perfect-bound book cover and the selected text highlighted in gloss varnish, the book designer has produced what looks like a multi-dimensional, as well as multi-textured, cover treatment. You can even run your fingers across the gloss and matte finishes and experience on a physical level the difference between the two.
Something like this could never have been accomplished on an ebook. And it works on more than an aesthetic level. On a cognitive level it separates the title from the rest of the cover as being of the highest importance.
Now the same thing achieved by playing dull and gloss varnish against one another can be achieved with a matte and gloss laminate. In your own print design and print buying work you may want to ask your book printer which of these capabilities he has in house and which might be more expensive or less expensive. If he has to subcontract out such work because he does not have one of these technologies on the pressroom floor, your print book will cost more. Also, it’s wise to request printed samples so you will know how each option will look and feel.
In most cases, if your printer can apply the cover coating in house, the extra cost should not be excessive, because this coating process usually involves only the custom printing plates.
That said, UV coating and lamination will outlive varnishes, which will tend to yellow over time. Therefore, you might want to use a dull laminate on the background for the softer effect and then use a spot gloss UV coating for the highlights.
Based on my research, the laminate for the background is either a transparent flat sheet (a film) applied to the underlying press sheet or a gloss liquid spread on top of the press sheet (which apparently tends to be more uniform than film lamination).
Then, if you add a gloss UV coating (cured or hardened instantly by exposure to UV light) for the title of the book, your printer might use a custom screen printing technique (rather than an offset printing technique) to gloss highlight the type in an especially bright and reflective manner.
Beyond these, there are two more options for setting one element of the design (like the title) apart from another (like the photos). These are foil stamping and embossing.
To be more specific, I have another sample book, an art book that describes the various movements in art throughout history, including Impressionism, Regionalism, Cubism, and many, many more. It is entitled …isms: Understanding Art. This particular sample print book also has a matte or dull coating in the background (like the prior book), and the book designer has set apart the “…isms” portion of the title by using a deep yellow stamping foil instead of ink to print the word (at a rather large point size).
What makes this treatment different from the aforementioned varnish, laminate, or UV coating is that on a tactile level the foil stamped word (…isms) feels a bit thicker and more substantial to the touch. It’s subtle, but I can feel the difference.
On a production level, however, there are a number of differences. Varnish is printed on a commercial printing press inking unit from a printing plate and press blanket. And, as noted above, spot UV coating (which is usually a flood coating) can be added as a spot coating (text only, for instance) using a custom screen printing technique rather than an offset printing technique.
But for foil stamping your printer must have a metal die made in the shape of the letters (in this case …isms). This metal die will then be heated and struck against a roll of foil. It will “punch out” the text, and then using high heat it will adhere the foil to the substrate (in this case the spine and front cover of my sample art book).
In addition to the high contrast between the gloss yellow foil and the dull matte background coating, in the case of …isms: Understanding Art, the contrast is more dramatic because for the most part readers expect to see metallic gold or silver foils rather than a brilliant canary yellow foil (which is also denser than any printable process-color ink, like yellow, would be on an offset press).
Stamping foils come in gloss or matte versions and in multiple colors (including matte and gloss black), which make for a unique look. In your own work, ask about prices and request printed samples before committing to this technique.
The final (and even more tactile) option is embossing, in which a two-part metal die (a raised portion under the press sheet and a recessed portion above the press sheet) produces a three dimensional image when forced against the paper using a letterpress. (Embossed elements rise above the surface level of the paper, while debossed elements are recessed.) Before the embossing or debossing process, you can also register an offset-printed image where the embossing/debossing will be.
Like foil stamping, embossing and debossing will require an extra metal die (made by your printer’s subcontractor), and this will add time and money to the job. However, this effect can look quite dramatic, so it may be worth it.
Faux Case Binding
Here’s another technique to make your print book stand out. Usually a case-bound book has a heavy binding made from thick binders’ boards (a chipboard product). It’s great in terms of durability, but it’s a bit cumbersome.
As an alternative, you may want to use thick cover stock for the turned-edge cover. The book I mentioned earlier (…isms: Understanding Art) has a cover produced on a thinner (thinner than chipboard at least) cover stock (like the paper used for the cover of a perfect-bound print book). It has endsheets, pasted over the turned edges of the cover, and flyleaves—all just like a case bound book. It even has headbands and footbands to cover the bind edge of the folded and stacked press signatures. And you can see a crash (liner) between the press signatures and the outer spine. Plus, the text block actually floats away from the exterior spine like a loose-back case-bound book.
If all of this sounds like gibberish, the only important thing to remember is that it looks and feels like a case-bound book but without the weight. Plus, the cover is more flexible.
And in the case of my book, there are French flaps folding in (over part of the interior front and back covers).
So what you have is a cross between a paperback and a hardback.
Paper Half-Cover Wraps
Finally, here’s a novel idea. A book called American Junk, which my fiancee bought at our favorite thrift store, has no title on the front cover, but it has a half-cover wrap to carry the title, byline, and a little blurb about the book. Fortunately, the title is also on the printed spine of this case-bound book, so you will know what book it is when the cover wrap is removed.
When I say half-cover wrap, it is actually centered vertically on the cover (letting the reader see photos above and below the wrap), and it goes around the book like a dust jacket and into the front and back inside covers.
It is also produced with thick brown kraft paper, so it looks and feels like the paper of a grocery bag (or the book covers we used to make from grocery bags in the 1960s). The type is huge and printed in black ink (the word JUNK) or small and printed in burgundy ink (the word American), which is letterspaced (i.e., spread out letter by letter dramatically).
Consider something like this for one of your upcoming projects. The contrast between the gloss stock of the cover and the mottled, uncoated cover wrap is striking.
And that’s what this is all about—creating a print book design no one can forget.
The Takeaway
Reading a book on a computer will tire your eyes more quickly than reading ink on a page. With an e-reader, this is less of a problem. However, there are a lot of tactile elements of a print book that cannot be replicated in an electronic version.
When you design a print book for offset printing or digital printing, ask yourself the question, “How can this book design benefit from the qualities only available in physical, printed books?” Look for samples in your own home library (as I have done), and also ask your book printer for samples that will inspire you.
Posted in Design | Comments Off on Book Printing: More Approaches to Book Cover Design
Tuesday, October 24th, 2023

Photo purchased from … www.depositphotos.com
The Printing Industry Exchange Blog is #12 of the best 40 digital printing blogs, as selected by FEEDSPOT.
A relationship with a printer is just that, a relationship. To move forward, it must involve mutual trust. You need to know the printer will produce your job in a satisfactory way, and your printer needs to know you will pay as agreed.
This PIE Blog posting is a case study about agreements and expectations, and how there can unfortunately be a perfect storm when everything goes wrong. At the same time, there are ways to minimize this chance, and to understand the spoken and unspoken agreements with your commercial printing vendor based on accepted industry standards.
The Backstory
I am currently addressing a payment situation with a client for an annual report promotional mailing.
This is the job: a 24-page annual report in 4-color process ink, trimmed and saddle stitched; a 4-color letter on 60# offset stock; a 28# open-side envelope (which opens on the long side and is therefore “machinable,” which means it can be stuffed on a machine rather than by hand); and all mailshop work to prepare 1,500 copies of the aforementioned package and enter them into the mail stream.
All of this was produced over the course of the summer, which is prime vacation time for both commercial printing vendors and my clients–which led to people not being present to read and sign contracts, cut and sign checks, and respond to emails. Fortunately, the printer had enough staff to keep things going at all times, and I made sincere attempts at all times to contact my client (and/or her boss) in a timely manner with all contracts, schedules, and requests for payment.
The Schedule
The long and short of the matter is that a contract was drafted and signed in late May, and an initial request for half payment was made in early June. The half payment was not made in a timely manner, and at the end of the third week the printer put the job on hold, moved the annual reports, envelopes, and promotional letters into storage, and requested full payment plus estimated postage in order to continue.
(Keep in mind that my client is a “cash” client, not a “credit client.” Therefore it is within industry standard for the printer to require half payment before work starts–to cover the direct cost of buying printing paper, for instance. And it is within industry standard for the custom printing supplier to require final payment before shipping, unless the client has established credit terms. Postage is a direct cost, up-front, paid to the US Postal Service, so it is within industry standard for the printer to request and receive this estimated payment before the mailshop preparation or mail drop: the entry of the product into the mail stream by the Post Office.)
With that in mind, I encouraged my client to pay by electronic funds transfer rather than by check to eliminate any chance of delay in the mail delivery. I also explained in writing the reason the printer now required full payment, rather than half payment, to proceed.
By the end of a week’s time my client’s accountant (outsourced, not in-house) had sent out two checks (half payment and full payment) in error—and without using the faster option of the electronic transfer of funds. The process would have gone more quickly if two of the three participants had not been on their summer vacations.
I asked the printer to let me know when the checks had arrived, to destroy the check for the lesser amount, and to let me know when the remaining check had cleared (and therefore when work on the job could resume).
The job went into the mail as soon as it could. Unfortunately, this occurred about two days after the US Post Office raised postage rates, incurring just under $400 of additional charges for my client.
Needless to say, my client refused to pay the surcharge and said the printer was responsible because they had held up the job. This is where things are now.
What You Can Learn to Avoid This
All of this was the perfect storm of miscommunication augmented by key people being out of range of communication (due to summer vacations). I have drafted a letter to my client including a timeline of all activities, from the signing of the contract through billing, and including all invoices from the printer and the US Postal receipt (Form-3600R) for the mailing.
I have not heard back yet, but the bottom line is that since I had kept all relevant emails describing what was agreed upon and what had happened (plus references to the standard printing industry terms and conditions), I expect an eventual positive resolution. We’ll see what happens.
That said, this might happen to you (maybe once in your career as a designer or print buyer), so you may want to consider the following to help you sidestep such a nuisance:
- First of all, postage estimates from the printer are just that—estimates. The printer will bill you for additional costs or refund to you any credits you are owed.
- You can pay by cash, credit, or Visa in many cases. Payment by Visa will probably incur a 3 percent surcharge. “Cash” terms will require a down payment and a final payment before the job can be delivered to you or mailed to your clients.
- I particularly like the option of electronic funds transfer for payment. Funds go from your company’s bank to the commercial printing vendor’s bank without any chance of delay or loss in the mail. The transaction (and the clearing of funds) will go much faster than the check writing, mailing, and bank-clearing process. In most cases this service is offered for free and sidesteps the 3 percent credit card fee.
- You may not want to establish credit terms. Not that your credit is bad, but I believe an inquiry may affect your credit score. That said, if this is not a concern for you, you may appreciate being billed and having 30 days to pay.
- Your custom printing supplier has to charge you up front because he must buy paper, and this is a major expense. He can’t be expected to front the money for paper, or for postage for that matter.
- Charging you before releasing your job ensures your full payment in a timely manner. After all, the printer can’t front all monies and then come to you for reimbursement.
- Schedules are important. Printers take holidays, too, and count workdays as Monday through Friday only, not Saturdays and Sundays. If you need rush services, this may be negotiable for a higher cost (i.e., to hire more staff to complete your job more quickly).
- Good planning and communication with your printer are essential. If a company’s accounting services are outsourced (which is the case with my client), in slow times (such as late summer during vacations) unforeseen delays in payment can occur.
- It’s important to keep records (written notes as well as a history of relevant emails) to explain your workflow should something go wrong.
- No one wants to be considered a difficult client. The preceding list shows the importance of requesting a bill once you have signed the printer’s contract, and then paying it promptly on the agreed-upon schedule. Nothing will better ensure the timely delivery or mailing of your print job.
- It would be wise to read the “Terms and Conditions” page of your printers’ contracts and familiarize yourself with the customs and standards of the commercial printing industry. Getting It Printed by Mark Beach and Eric Kenly is an outstanding book on custom printing, and it includes a copy of these in the text. (This may be out of date, since my personal copy of the book is a number of decades old. So you may want to Google these printing terms and conditions as well.)
The Final Takeaway
If you understand the written and unwritten laws of conducting business in the field of commercial printing, you can see what your rights and responsibilities are as well as what your printer’s rights and responsibilities are. This will keep your response to any problems on a logical rather than emotional level.
I’m sure my client was completely authentic in feeling he had been mistreated by the printer and by the Post Office. That just happens to not be relevant to the agreements made with the printer and the rules pertaining to US Postal Service rate increases.
We’ll see what happens.
Posted in PrintBuying, Printing Contracts | Comments Off on Custom Printing: Case Study on Scheduling and Payment Terms
Monday, October 16th, 2023

Photo purchased from … www.depositphotos.com
The Printing Industry Exchange Blog is #12 of the best 40 digital printing blogs, as selected by FEEDSPOT.
A lot of these PIE Blog articles address various aspects of buying commercial printing. But really, if you have to start from scratch, how do you even begin to find good printers?
Since the onset of Covid, and with the rise in paper prices, I myself have had to revisit this question in my own print brokering work. So here are some of the things I consider when vetting a new printer and when deciding whether to continue with, or disconnect from, a printer I’ve been working with.
As I think about this, it sounds like pursuing a romantic relationship or letting one go. I think this is because, to me, it’s all about developing a mutually advantageous relationship with a custom printing vendor that is based on trust.
Draft a Written Specification Sheet
The first thing I do–and I have done exactly this since the early 1980s when I started buying commercial printing–is draft a specification sheet for the print job. I think of this as a blueprint for the job, a foundational document that will contain the words and numbers describing every element of the print job, from the dimensions of the product to the press run, from the date for upload of art files to the job delivery and/or fulfillment date.
Over the years I have devised a prototype of this form, which I adjust as needed for each new job. Keeping it in writing not only makes me more able to envision the job but also less likely to forget key elements. It also means that I have a single document to send to a number of printers. And all of these printers will be providing estimates based on the same specifications, the same details. Otherwise there will be no way to check and recheck to make certain that an individual printer has not inadvertently missed something.
And this does happen regularly. The challenge is to catch the errors and omissions and ask the printer for clarification. To do this I personally read over each estimate a number of times, comparing the printer’s bid to my own specification sheet. From time to time, in doing this, I also see other specifications I may want to add to my “master spec sheet.”
Choose Printers Appropriate for the Print Job
Keep in mind that not all printers specialize in the same things. Some printers are skilled in book printing. Others, called commercial printers, are more generalists. I personally choose these for promotional work such as brochures. There’s often some overlap, but I have found that book printers, for instance, offer better pricing on books than on other print jobs.
Often, if not usually, this is because they have not only the particular skill set and knowledge base, but book printers usually also have book printing and binding equipment on their pressroom floor and therefore don’t have to subcontract out portions of a book printing job. Some book printers, for instance, have perfect binding in house. Some even have case binding in house (but this would probably be a very large printing plant, since there’s usually not enough case binding work available to justify such an equipment expense).
In this light, about two years ago I needed bids on a scratch-off poster (similar to a Lotto card) with a coating that could be rubbed off to reveal printing underneath. I also once needed a printer that could die cut printed cards in the shape of house keys. In both of these cases I started my research with a local printer that produced specialized marketing initiatives for advertisers. They had the specialized knowledge, technical skill, experience, and equipment.
Another time I needed to have a wood sample box crafted to display flooring materials. In this case I went through trusted colleagues, asking them for names of vendors they might suggest. This was also helpful in finding custom screen printing vendors.
In short, referrals from colleagues are golden.
Details of Delivery, Printing Flaws, Etc.
Here are some random, general things to consider in your print buying work:
- Check the printed product immediately upon delivery. Getting It Printed (Mark Beach and Eric Kenly) says you should do this within 15 days. I still believe it’s best to do this immediately. If you see any flaws, check random samples from a number of the packed cartons to get a sense of the extent of the problem. Contact the printer and discuss what you found. Determine whether the job is still usable. (Be realistic about this; there may be alternatives to a reprint.) In one case, about 15 years ago, I had to have the printer retrieve the job and replace and re-trim the covers due to outgassing (air bubbles) that lifted the film laminate off the heavily inked cover (which had not yet dried sufficiently when it was laminated).
- Discuss overs and unders. The acceptable norm is 10 percent overs or unders (with the total printer’s charge to you adjusted with a surcharge or credit to account for these). That said, this is often negotiable. If you need “no less than” a certain number, the printer can charge for more overs (also often negotiable). Printing an exact number is not possible, since there is a waste factor inherent in the multiple processes of printing and binding. (Some books, for instance, get damaged when they’re being bound. If you print the exact number and lose copies through spoilage, you’ll always have too few copies at the end of the process.)
- Discuss the point at which ownership of the job passes from the printer to you. If the bid notes “FOB Printer’s dock,” this usually means the printer is using a separate freight carrier, and you take ownership of the job at the printer’s loading dock, where the subcontracted freight company picks up the job. If the printer uses his own truck to deliver the job to you, you take ownership at the delivery point (rather than the pick-up point).
- The printer’s liability for any problem is never more than the cost of the actual print job. The printer cannot be held liable for related problems (such as loss of your client’s business) that occur because a job is late or has flaws in the printing.
- Research printing trade customs in Getting It Printed (or online). Or look for these trade customs on the back of your printer’s hard-copy job estimates. These will give you an idea of what is and is not a reasonable expectation in the commercial printing trade. This includes who owns elements of the job, schedules, tolerances for various custom printing processes, liability, etc.
The Takeaway
So the takeaway at this point, regarding your own print buying work, is to:
- Draft a specification sheet for each job that sets forth every aspect of the project, from prepress to printing to delivery or fulfillment (in which the printer sends out printed materials to your clients). Make this as detailed as you can. Include scheduling information. I’d also encourage you to either purchase the current edition of Getting It Printed (Mark Beach and Eric Kenly) or search online for sample offset and digital printing specification sheets.
- Do research online. And ask colleagues and even other printers for suggestions. (That said, it’s better to ask printers for alternate sources for jobs that differ from what these printers themselves specialize in.)
- Make sure you’re going to the right vendors. Commercial printers print most kinds of jobs, often including digital and large-format jobs like banners. Book printers specialize in books. Web-offset printers produce long-press-run jobs like books and journals, while sheetfed printers produce jobs with shorter press runs. If you’re in doubt, share the spec sheet with a printer and ask whether this job matches his skills and equipment, and whether he expects to be competitive.
- Ask for printed samples. Granted, this will be the best work the printer has produced, but also pay attention to whether the printer can match the samples to the specifications for your specific print job.
- See how long it takes to get the estimate and the samples. You’re making a judgment as to whether you will be a priority. These intangibles are just as important as price and quality. You’re determining whether you can trust the vendor. In this light, it’s often smart to start a new printer off with a smaller rather than larger first job.
- Consider a service like the Printing Industry Exchange. When I need a new printer, I upload specs to the PIE server, and I’m often contacted by printers I didn’t even know existed before. Granted, I need to do my own research, vetting their pricing and samples (and sometimes even checking their references), but it’s a good way to make new connections. In fact, I’ve found many of the printers I now like and trust the most this way.
- Don’t let price be the absolute determining factor. There are intangibles that are at least as important as, if not more important than, price, such as whether the printer will maintain (or even beat) the agreed-upon schedule and whether the printed product will stand apart from (in terms of quality) other print vendors’ work. Granted, this is the kind of thing that one determines in the course of a long relationship with a printer. The little things count. You usually get what you pay for, so within reason it’s not wise to buy based entirely on price.
Posted in Printing Contracts | Comments Off on Custom Printing: Thoughts on Negotiating Jobs with Printers
Sunday, October 8th, 2023

Photo purchased from … www.depositphotos.com
The Printing Industry Exchange Blog is #12 of the best 40 digital printing blogs, as selected by FEEDSPOT.
Halloween is almost two months away. That’s not too soon to start planning.
If you look at the photo above, you can learn a lot about Halloween. First of all, in this country we have pumpkins we carve into Jack-O’-Lanterns. This is a lot easier than in past centuries (in Europe), when people carved faces into turnips and set lit candles into them. A turnip is smaller than a pumpkin, and the flesh of a turnip is much harder to carve.
On a spiritual note, Halloween was the Celtic New Year, when the veil between the world of the living and the land of the dead was thin and permeable, and people (i.e., souls) could travel in both directions between the worlds.
The other elements in the photo above are the painted skull and the marigolds, both of which represent the Day of the Dead (Dio de los Muertos) in countries like Mexico. This holiday celebrates those who have passed on. People dress up, paint their faces (often like the skull in the photo), and leave marigolds and offerings of food at gravesites of their loved ones.
So How Does This Pertain to Commercial Printing?
It’s relevant in at least five ways. For me, these come to mind immediately.
- The technology of 3D custom printing is well suited to the little items we associate with Halloween, particularly since most of the items are fanciful. (It’s much easier to 3D-print a goblin than to either find a live one or carve one out of plastic or wood. Or, you could potentially 3D print a Hand of Glory–Main de Gloire–out of wax and use it as a candle that will supposedly make you invisible.)
- It is also possible to laser-print words and images onto waterslide decals and then wet them and slip the images off onto ceramic items. Then when you fire the items in a kiln, the high heat will allow the glaze to soften and the iron in the laser toner particles to become embedded in the glaze.
- Custom screen printing would also be an option. In this technique you would force thick ink through a mesh screen with a squeegee. First you would attach a stencil to the screen, and when the ink is drawn down the length of the screen with the squeegee, the solid areas of the stencil would block the ink while the open areas of the stencil would allow the ink to flow through. This is especially good for custom screen printing Halloween t-shirts.
- Digital commercial printing is another option–specifically inkjet. These days “direct-to-shape” (DTS) printing is in vogue, so if you have a 3D object you want to decorate, you may be able to find a vendor with direct-to-shape printing capabilities. Perhaps you have a foam rubber pumpkin you want to decorate. If the product can fit in a direct-to-shape printing enclosure, you may be able to decorate it directly with the inkjet press. This works because the jets of the inkjet press never actually touch the substrate. Instead they are suspended above and moved around irregularly shaped objects.
- Pad printing is still another option. This is a technique in which a little rubber bulb is pressed against an inked custom printing plate, where it picks up the image. The pad is then moved into place over the substrate. When the pad is pressed against the substrate (in this case perhaps a Halloween golf ball with a printed image of a ghost), the image is transferred to the new object. (Usually all of this takes place in a coordinated fashion, mechanically, on a pad press. It is an ideal commercial printing method for objects with irregular surfaces like golf balls.)
Some Examples: 3D Printing in Plastic
Let’s address a few of these custom printing technologies individually and in more depth, and maybe identify some Halloween items for which they would be ideal.
First, let’s discuss 3D printing, since you can find these printers at a reasonable price point now in big-box computer stores. In my mind, 3D printing is similar to a souped-up version of inkjet printing. Plastic filament from a spool is melted and then jetted through a print nozzle, producing layer upon layer of the plastic to build up a physical product that has length, width, and height (in contrast to a 2D inkjet printer, which creates an image with length and width only). Once the melted plastic filament hardens again, you have a physical object.
When I Googled “3D Halloween,” I found images of pumpkins with all kinds of detailed expressions. You would still have to paint the items, since the filament that I’ve seen prints in only one color. Plus, the extrusion jet only prints layers, not specific items. But you can capture detail that would not be feasible in any other method. So this lends itself to things like jewelry (perhaps ghoolish earrings for the witch in the family).
I was also struck by images of Jack-O’-Lanterns that were not only intricate but hollow, with openings for eyes and a mouth that led to the interior reaches of the Jack-O’-Lantern. When you remember that these 3D items are produced from digital CAD-CAM data and extruded layer by layer, you can imagine how much detail can be included for both the exterior and interior of a 3D printed item.
That said, I do believe that some filing and cutting away of any imperfections may need to be done in some cases, but presumably much less than for removing excess plastic from around the seams of injection-molded plastic items.
I also found 3D printed ghosts, spiders, and monsters. In all cases, it was the level of detail that intrigued me.
More Examples: Ceramic Printing
My fiancee has three items that exemplify custom printing on ceramics: two palmistry hands with alchemical and astrological symbols and one phrenology head. (The phrenology head notes which parts of the person’s cranium pertain to various characteristics and life events, in such a manner that you can presumably tell fortunes based on the bumps on her or his head.)
In all cases these are black markings (no color involved) on gloss, glazed ceramic.
Usually, one could decorate these palmistry hands and phrenology head with ceramic glazes containing heat-resistant minerals that would give a specific color to the ceramic base product. These could even be added to the ceramic piece (as noted before) using waterslide decals, if you did not want to paint the design directly onto the ceramic item.
With waterslide decals, you image the decal in a “backwards,” or wrong-reading, orientation. Then you wet the decal, which will make it curl. If you wait a little while, the decal will flatten again, and you can place it against the item you wish to print (such as my fiancee’s palmistry hands). If you then slip away the waterslide backing, you will leave the printing on the base ceramic piece (such as all the symbols for the planets printed on my fiancee’s palmistry hands). Since this mineral glaze is heat resistant, it will stay in place in the high heat of the ceramic kiln, and the mineral will fuse with the glaze already on the ceramic hand.
A similar approach involves using a laser printer. One of my fiancee’s ceramic palmistry hands appears to have halftone dots comparable to laser-printing output. Apparently, since toner particles include iron, the high heat of a ceramic kiln will only burn away the plastic and binders in the toner powder leaving the iron toner particles in place. The benefit of this particular method is that you can get the precision available with laser printing.
So for printing text on a phrenology head or symbols of the planets on a palmistry hand, it can be far easier to laser print on the decal, and then transfer the image to the ceramic substrate, rather than paint all the letters in a colored glaze by hand.
And the process works better with a glossy (rather than matte or dull) glaze, since the heated gloss glaze in the kiln absorbs the toner particles, whereas the toner particles only sit up on top of a matte or dull glaze. This makes the bond with the gloss coating more durable (rub-resistant).
My fiancee also has a multimedia piece with a printed background (a 3D hand decorated with alchemical symbols and set within a “shadow-box” Halloween-imaged background). First the background was printed on paper using offset lithography (I can see the halftone dots) and then glued to the inside of an open wood box. Then a cast-plastic palmistry hand painted with astrological symbols was set within the shadow-box frame. (I say hand-painted because the ink or paint is thick, like screen printing ink, and because there are no halftone dots, as there would be with a laser-printed image.)
You may want to Google this waterslide decal process, which allows you to laser print an image (backwards) on plastic, slip the wet image onto a ceramic piece, and then kiln-fire the item to make the image and text a permanent part of the surface glaze.
Posted in Printing | Comments Off on Custom Printing: Get a Jump on Printed Halloween Swag—Boo!
Monday, October 2nd, 2023
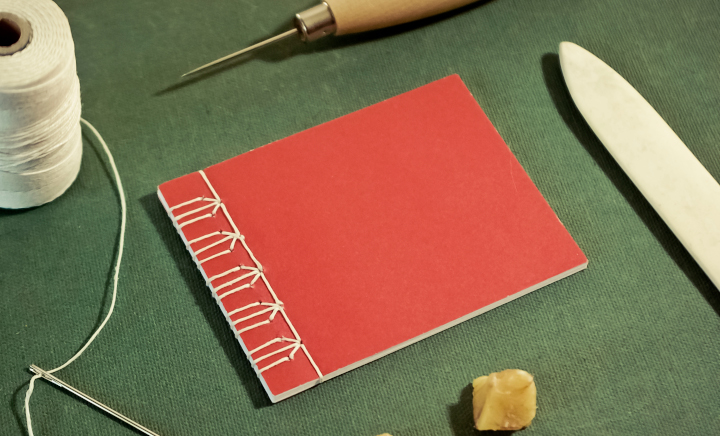
Photo purchased from … www.depositphotos.com
The Printing Industry Exchange Blog is #12 of the best 40 digital printing blogs, as selected by FEEDSPOT.
What you include on a book cover in the way of graphic design, or creative, or imagery, is just one element of print book cover design. The physical presentation, including what materials you use and how you combine them, is equally important, and it sets the tone for the whole print book as well.
Stab Binding (from Japan, China, and Korea)
I know this sounds grisly (only the book pages and cover pages get stabbed), but it is actually an elegant and ancient Asian bookbinding technique. (I included a photo of this binding option at the top of this blog article.)
The process does not involve any glue (unlike perfect binding). All you do is stab holes into the cover and book pages and then lace up the book over the spine edge with string. If you Google this process, you’ll see that you can make a number of different geometric patterns with the string.
This might be a unique binding method for a writing journal or sketch book. You could even use special paper (maybe seed paper, with actual seeds in the paper stock, or paper containing flecks of flower petals—anything to make the finished product more tactile and organic).
Stab binding has a long history (centuries) as a binding method in China, Japan, and Korea.
Unfortunately, stab binding, which really is similar to the current method of side stitching (in which case you would use staples instead of string), will not allow the open book to lie flat. But if lying flat is not an essential characteristic of your print book, this may be a good option. Personally, I consider it a unique, aesthetically appealing option for a “hand-crafted” look.
A Few Options for Case Binding
I have a number of books from the late 1800s that were case bound. This option is very durable. But it also provides at least three variations that come to mind immediately.
Leather, fabric, or paper can be wrapped around the binder’s boards used in case binding a print book. Binder’s boards are thick chipboard (a kind of dense cardboard stock). A flexible spine is added to the book between the front and back covers, and the interior text block is actually suspended from this “casing,” allowing the pages to be turned, and allowing the print book to lie flat when open.
In terms of book decoration, the front cover image and title, for instance, might appear not on this paper, fabric, or leather book cover but rather on a separate dust jacket wrapped around the book.
Alternatively, you can use hot-foil stamping (heat and pressure applied to a roll of metallic foil) to punch out lettering for the book title and affix this to the book cover material. And then you can add a more elaborate dust jacket for a repeat of the cover text and an added cover photo.
The dust jacket, by the way, would be a large printed and perhaps UV coated or film laminated press sheet with flaps that fold around the book binding boards. In this way you can design a more intricate and complex cover than you can with the foil stamping on the main fabric, leather, or paper cover.
One thing to keep in mind with the foil-stamping process is that you will need to pay to have the printer’s subcontractor create a metal die for the foil stamping, and this can be expensive. It will also add to the overall book production time.
That was the first option. Another option is to print the book covers on flat press sheets and then laminate them directly to the binder’s boards and spine of the case-bound print book. If you think back to many of your high school or college textbooks, these were produced this way, with colorful covers but no separate dust jackets.
If you skip the dust jackets and print the book covers directly on press sheets that can then be laminated to the binder’s boards, you can avoid producing (and paying for) metal dies to cut the hot-stamp foil (noted in the prior book decoration option).
The third option for case binding is really a hybrid, mixing “Wire-O” binding with case binding. You may have seen these books in the cooking section of the bookstore. Metal wire loops are stacked parallel to one another and are affixed to a wire running parallel to the spine. This wire apparatus (with the text of the book attached to it like a spiral notebook) is looped into the cardboard spine of the case-bound book. (The loops are often visible from the outside of the spine.)
On the interior front and back covers of such a book, you can see that endsheets have been pasted onto the binder’s boards (as in case-binding work). With both the wire loops and the case binding, this is an especially durable option, which is probably why publishers often choose this method for cookbooks. The books also lie flat when open, which is useful when you’re using both hands to prepare food.
You can assume that this will be an expensive binding option, since the “Wire-O” portion of the binding involves handwork. But for the right product, it can be a very attractive and functional option.
The Usual Suspects: Saddle Stitching, Perfect Binding, and Mechanical Binding
To round out this discussion, I’d like to briefly mention the more traditional, and less expensive, methods you can choose to bind your books.
Saddle stitching involves nesting book signatures inside one another (when bound and trimmed, these would look like a stack of four-page signatures, one on top of the next, folded, with staples in the center). This is probably the cheapest option. It’s often used for magazines and journals. But the main downside is that you don’t have a spine on which to print the book title, and you have a size (page-count) limit of about 96 pages (three 32-page signatures) or less. I’ve seen pages fall off the center staples in magazines exceeding this length. Wherever you look online, you’ll find a different page number limit (because it all depends on how thick your paper is), but 96 pages is a good place to start discussing binding options with your printer.
Perfect binding is like case binding without the hard case (and binder’s boards). It’s for longer print books. Unlike case bound books, the text of the book is not suspended from the heavy cardboard book-cover boards with endsheets. Rather the paper cover (usually of a thicker stock than the text) is just wrapped around the text block (the stacked press signatures of the text, as opposed to the nested press signatures of saddle stitching). The paper cover is glued to the spine, and the book is then trimmed on three sides (top, bottom, and front or face margin).
Perfect bound books are durable, and they come at a reasonable price. Almost all of the paperbacks you’ll find (that aren’t saddle stitched) will be perfect bound. Ask that your printer use PUR binding glue. It’s flexible, and it doesn’t dry out and get brittle as it ages. It’s worth a little extra money.
The third option, mechanical binding, includes tape binding, spiral wire (like spiral notebooks), plastic coil (a plastic wire version of the spiral wire), Wire-O (mentioned above in the composite binding for the cookbook), Velo binding (a plastic strip on the top and bottom of the text block running parallel to the bind edge and attached to one another through holes drilled through the text), and GBC (or comb binding). The list goes on. I’m sure there are more.
What you need to remember is that mechanical binding almost always requires handwork. So the unit cost can be expensive. That said, if you are producing a handful of reports to distribute at a conference, this will save you the make-ready expense of perfect binding or saddle stitching your print book.
As to the design of saddle-stitched, perfect-bound, and mechanically bound books, these really aren’t very exotic—at least not like the Asian stab binding. So in these cases you’re pretty much dependent on the visual design of the covers rather than the intricacies of the binding itself for the “Wow” factor.
That said, a client of mine prints a number of 5.5” x 8.5” perfect-bound book titles each year. And they (husband and wife) always specify French flaps. This is a 3.5” extension to the front and back covers. The flaps fold inward over the interior front and back covers and make the book look like it has a dust jacket. This is more of a European approach (so it looks stylish), but it also provides space in the front and rear of the book for an author photo and bio and perhaps some marketing text.
So in this case it is possible to make a perfect-bound book look sexy.
The Takeaway
Consider both the creative design and the physical construction of all of your book binding options. Think about utility, price, length of the press run, and schedule (for instance, cookbooks that mix case binding and Wire-O binding cost more per unit and take longer overall to produce).
Look at printed samples, and think of not only the appearance but how the binding method will feel in the hands of the reader. Will he/she need four hands in order to both cook and refer to a cookbook that doesn’t lie flat?
Appearance and utility. These are two key concepts to keep at the top of your mind when selecting the perfect binding approach for your print book.
Posted in Book Binding | Comments Off on Book Printing: A Selection of Creative Cover Options
|
|